HLG QB132 V2 and LRS-350-36 DIY Build

MtRainDog

Blümen Meister
Howdy folks! I'm starting my first DIY build of the ever popular QB132/LRS-350-36 combo. I'll try to share lots of helpful pics as I progress through this build. Any and all help is welcome and appreciated!

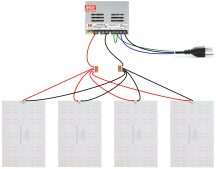
Here's a quick diagram I put together showing the boards and driver wired in parallel that I'll be following:

qb132-4x2-wiring2-small.png
 
Last edited:

MtRainDog

Blümen Meister
While I still need a few more DIY supplies, figured I'd start with getting power to the driver.

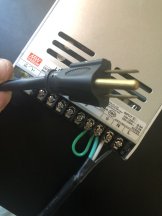
What I've done here is taken an ordinary grounded extension cord, and cut off the female end exposing three inner wires:

Green - Ground
White - Neutral
Black - Live

I stripped each one of the inner wires leaving about 1/4" of bare copper wire. This wire is made up of many individual strands. You want to twist them between two fingers until they form a fairly solid wire. This helps them from fraying.

driver1.jpeg

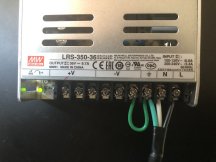
You can see I've jumpered V- to GROUND (that short little green wire in a U shape). Then I simply connected the 3 wires from the power coord to their respective slots.

Once connected, I plugged the cord in and let it run for a few minutes making sure all was ok. The green light ON is a good sign :)

driver2.jpeg
 

Punisher84

Just some asshole
Cool I’ll follow along. Just made a light with those boards but a hlg240 driver.

You able to run a dimmer with that driver?

Guessing you oughta run a heavier wire from the driver to the wago. Wago to board could still be a 18ga I suspect

350w will be running those boards wfo.
 

Bruno8437

Super Active Member
You able to run a dimmer with that driver?
For a dimmer, you need to wire in a PWM module. They are about $10-$12 on Amazon. There is a voltage adjustment on the LRS but it only allows voltage to change from 32.4V - 39.6V (+/-10%).

Also, curious to know why someone would use this driver opposed to the normal hlg driver from Meanwell that most people use?
1. Price
2. More watts
 

MtRainDog

Blümen Meister
Cool I’ll follow along. Just made a light with those boards but a hlg240 driver.

You able to run a dimmer with that driver?

Guessing you oughta run a heavier wire from the driver to the wago. Wago to board could still be a 18ga I suspect

350w will be running those boards wfo.
I went with 18g for both boards to wagos and wagos to driver. 18g is fine for these low voltages.

Also, curious to know why someone would use this driver opposed to the normal hlg driver from Meanwell that most people use?
To clarify my earlier post. Yes it’s cheaper. I paid $38 on amazon for the driver.

The difference is that the LRS series driver is a constant voltage driver, which has to be wired in parallel. All that means is the voltage to each board is the same, or constant. So using the LRS-350-36, we get 36v to each board (mine is actually set to 34.7v which was the highest stable setting i was able to use before the lights began blinking off and on)

The HLG series drivers have a variable voltage. If you wire in series using one of these drivers, the voltage “adds up” or “carries forward” with each component wired in the series. That’s why you see those drivers rated for much higher voltages like 1400 or 2100.
 

Punisher84

Just some asshole
I went with 18g for both boards to wagos and wagos to driver. 18g is fine for these low voltages.


To clarify my earlier post. Yes it’s cheaper. I paid $38 on amazon for the driver.

The difference is that the LRS series driver is a constant voltage driver, which has to be wired in parallel. All that means is the voltage to each board is the same, or constant. So using the LRS-350-36, we get 36v to each board (mine is actually set to 34.7v which was the highest stable setting i was able to use before the lights began blinking off and on)

The HLG series drivers have a variable voltage. If you wire in series using one of these drivers, the voltage “adds up” or “carries forward” with each component wired in the series. That’s why you see those drivers rated for much higher voltages like 1400 or 2100.
Good info. Thanks. I appreciate the explanation so a booger eater can understand it
 

MtRainDog

Blümen Meister
Ty for doing this thread I’ll be copying u soon. Super excited to build this light. It only took a war for me to get some what of an idea to know what I’m doing but I might just never stop building lights now
I know, they are really friggin cool, and easy to put together. And this setup is BRIGHT AF. Like I can only look at them for about as long as I can look directly at the sun. Blinding, leave light streaks in the back of your eyeball instantaneously lmao.
 

MtRainDog

Blümen Meister
Parts/Price List for my build:

1. 4 Pack HLG QB132 V2 Quantum Boards. 3000K color temperature. Amazon $129
2. MeanWell LRS-350-36 Driver. Amazon $38
3. 1/8" x 1" Aluminum angle bracket. One 8' and one 4' length. Lowes $26 and $14
4. 40ft of Red/Black 18 gauge electric wire. Amazon $11
5. Wago 221-415 Lever-Nuts 5 Conductor Compact Connectors 10 Pack. Amazon $10
6. Self-drilling/tapping sheet metal screws (for the frame). Lowes $5
7. M4 Metric screws and nuts (for attaching the boards). Lowes $5
8. 7/64 Drill bits (for pilot holes for the self-drilling frame screws). Lowes $3
9. 5/32 Drill bit (for holes to mount the boards to the frame). Lowes $2

Total: $243

All other materials/equipment I had on hand, so your true total price may vary.

QB132 - 4 pack

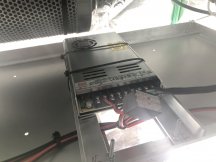
LRS-350-36 Driver

Electric wire

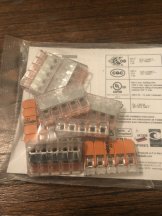
Wago connectors

wagos.jpeg

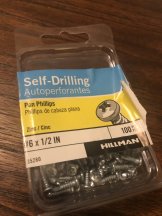
Self-drilling screws
screws2.jpeg

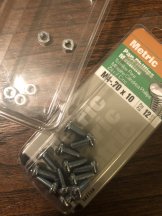
M4 Screws/Nuts
screws.jpeg
 

Opie1

Master Grower
Can one of you guys tell me if you can run 2 of the V1 288 quantum boards with a 240H-C2100A? I know you can run the V2’s, but can you use the V1’s with that driver?

Nice build MRD. If I didn’t already have the parts, I’d build one of these like you have.
 

Big Terps

Growing on a dime
Parts/Price List for my build:

1. 4 Pack HLG QB132 V2 Quantum Boards. 3000K color temperature. Amazon $129
2. MeanWell LRS-350-36 Driver. Amazon $38
3. 1/8" x 1" Aluminum angle bracket. One 8' and one 4' length. Lowes $26 and $14
4. 40ft of Red/Black 18 gauge electric wire. Amazon $11
5. Wago 221-415 Lever-Nuts 5 Conductor Compact Connectors 10 Pack. Amazon $10
6. Self-drilling/tapping sheet metal screws (for the frame). Lowes $5
7. M4 Metric screws and nuts (for attaching the boards). Lowes $5
8. 7/64 Drill bits (for pilot holes for the self-drilling frame screws). Lowes $3
9. 5/32 Drill bit (for holes to mount the boards to the frame). Lowes $2

Total: $243

All other materials/equipment I had on hand, so your true total price may vary.

QB132 - 4 pack

LRS-350-36 Driver

Electric wire

Wago connectors

View attachment 51467

Self-drilling screws
View attachment 51466

M4 Screws/Nuts
View attachment 51468
Good job so far with this! Wished id of had this info b4 i built mine. Alot of searching b4 i jumped into building mine. I had everything u have except for the wagos and i didnt jumper the ground wire on ur cord like u did. I ran wires from driver to each board. But nice job so far dude u will love em
 

Big Terps

Growing on a dime
Can one of you guys tell me if you can run 2 of the V1 288 quantum boards with a 240H-C2100A? I know you can run the V2’s, but can you use the V1’s with that driver?

Nice build MRD. If I didn’t already have the parts, I’d build one of these like you have.
I think u can. The v1's are rated at 3000ma max. Dont just go on my opinion tho. As i only have had the qb132s. But i think that u could use that driver
 
Top